
Client Portal & Requests
Enable client portal access for a Contact
Enable client portal access for a Contact
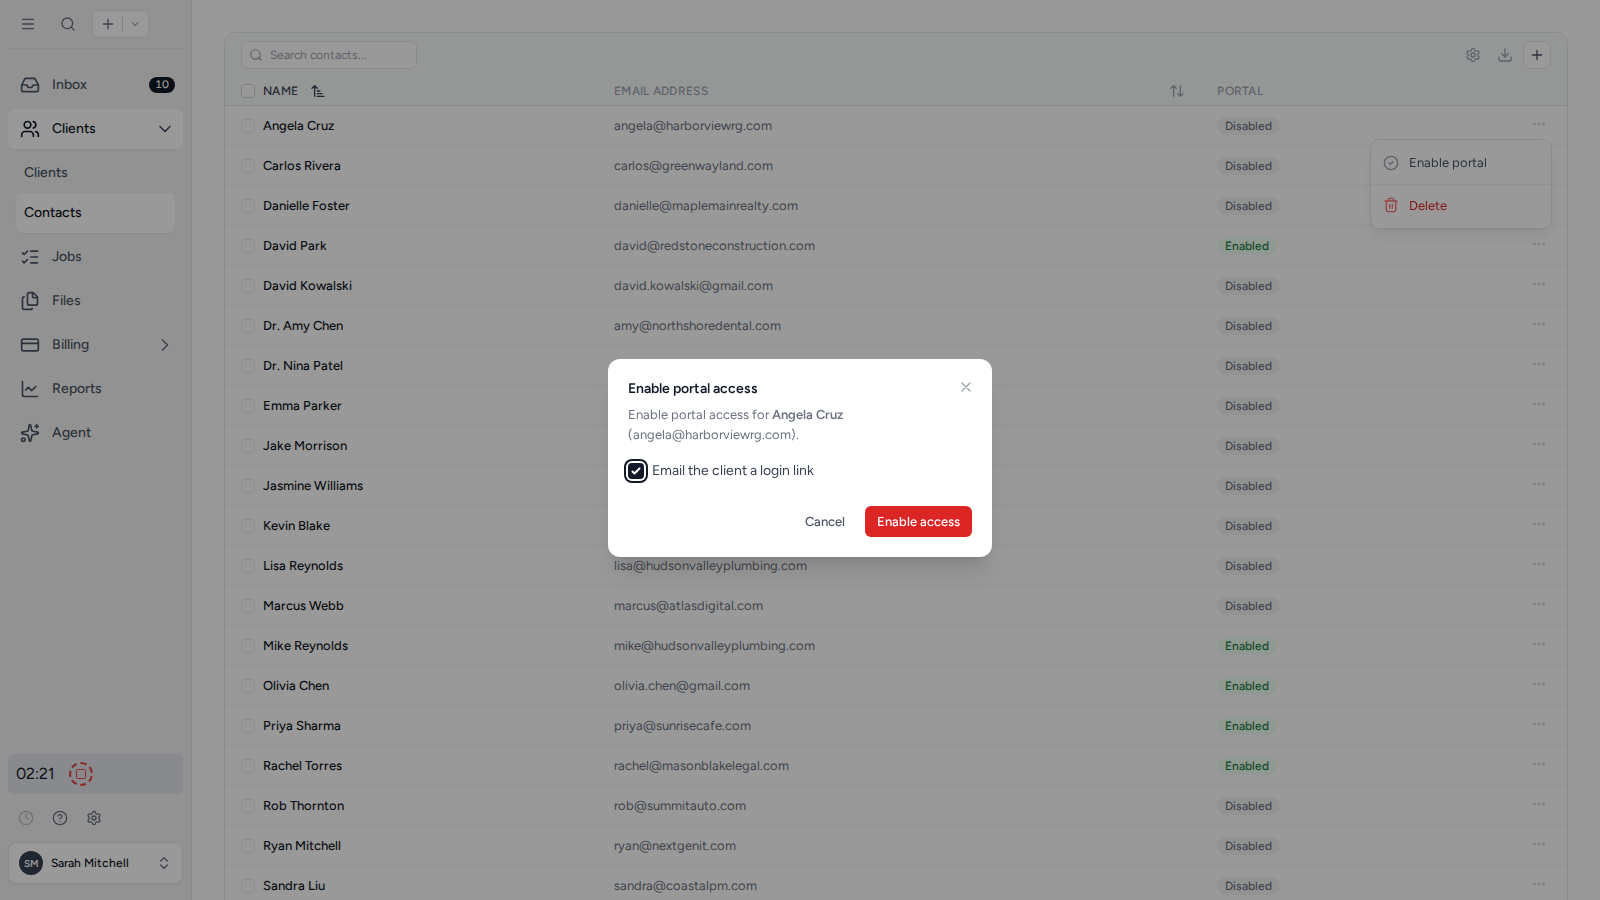
- Open Clients, then Contacts in the sidebar.
- Open the three-dot menu next to the Contact and select Enable portal.
- Leave Email the client a login link selected to notify them immediately, then confirm the change.
After portal access is enabled, the same menu includes Send access email so you can send another secure login link when needed. The Contact can use the link immediately or set a password later from the Set Password section of their portal profile. See Signing in and account security for the available sign-in methods.
See the client portal as a Contact sees it
To check what a Contact sees before you send anything, open the ... menu next to them and choose Preview portal. This opens the client portal as that person, so you can look over their requests, folders, and documents exactly as they appear to them.
Preview portal only shows for Contacts who already have portal access enabled. It does not sign them out, send them anything, or change what they can see.
To change the logo, portal icon or portal address, or add a portal link to your website, see Add your logo and customize the client portal.
Give two people on the same client their own portal access
A client can have as many Contacts as you need, and each one signs in with their own email address. Nobody has to share a password. This is the normal setup for a married couple filing jointly, two business partners, or a client who wants their bookkeeper to have access too.
Add both people as Contacts on the client (see Add a Contact), then enable portal access for each one from the Contact list. Both then see that client’s shared folders and documents when they sign in.
Give an outside professional access to one client
Sometimes the person who needs access does not work for your client or for you: their accountant at year-end, a solicitor handling a sale, a lender asking for statements, or an outgoing accountant during a handover.
The setup is the same, with three decisions that keep the access tight:
- Add them as a Contact on that client only. A Contact only ever sees the clients they are linked to, so this tells them nothing about the rest of your client list.
- Leave Include on requests and Billing contact switched off. The first would add them to every new client request for that client, and the second would show them the client’s invoices. An outside professional normally needs neither.
- Share only the folders they need, at View unless you expect documents back. Adding someone as a Contact shows them nothing on its own, so files stay invisible until you share them. Because only top-level folders can be shared, put the material for this engagement in its own top-level folder first. See How to share files with Contacts.
If they are already a Contact in your workspace, add them to the client through the New contact panel with Attaching existing contact? set to Yes, then pick them from the Contact list rather than creating a duplicate.
You can check what they have opened at any point. See Check who has viewed a document.
When the engagement finishes, open the ... next to them on the client’s Contacts tab and choose Disable portal. They keep their place on the client for your records but can no longer sign in, and you can choose Enable portal next year without setting everything up again. To remove them from the client entirely, choose Remove from client. See Remove a Contact from a Client.
Tidyflow does not require the client to authorise this in writing, but it is worth getting. Keep it short: who is getting access, what they will see, what it is for, and that either side can end it. You can capture it as a client request with an electronic signature, which stores the signed acknowledgment with its own audit trail.
Let two Contacts work on the same request
Portal requests are visible to the Contacts added to that request, not to everyone on the client. To let two people work on one request, add both as recipients when you create or edit it.
They then share a single copy of the request rather than getting one each. Either person can answer a question or upload a document, and each sees what the other has already done, so a jointly filed return stays one Job with one set of answers on your side.
To have a Contact added to every new request for that client automatically, set them to Include on requests on the client’s Contacts tab. See Automatically add Contacts to Client Requests.
Was this page helpful?
What went wrong?
Thanks for your feedback.
- Previous
- Electronic Signature Overview
Last updated October 1, 2026